
Do you pay monthly subscriptions for Netflix, Spotify and other entertainment? Do you share your subscription with a couple of friends? I do. And I always forget to remind them to pay up.
We have to automate this.
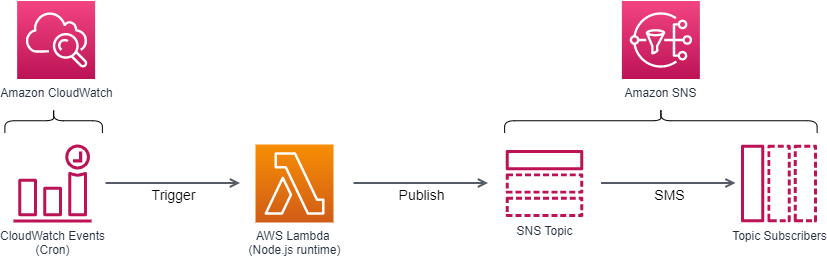
The Requirements
Let us start by having the end goals in mind. I wanted:
- To send a text message to people once a month
- Cheap
- Serverless on AWS
The Architecture
I needed 3 things to fulfill my requirements:
- Pub/sub topic with mobile numbers subscribed
- Publishing a message to the topic
- Monthly cron job
This is what I came up with.
I have no idea if this is the simplest solution for my requirements. Feel free to drop me an email if you have a better or simpler solution.
Configuring Lambda
The code for the AWS Lambda function is here (GitHub repo). I do not have a lot of experience in writing Lambda functions but I will try to explain what I have learnt so far.
// need environment variables for SNS_MESSAGE and SNS_TOPIC_ARN
const AWS = require('aws-sdk')
const sns = new AWS.SNS()

const params = {
    Message: process.env.SNS_MESSAGE,
    MessageAttributes: {
      'MsgAttrName': {
        DataType: 'String',
        StringValue: 'String'
      }
    }
    TopicArn: process.env.SNS_TOPIC_ARN
}

exports.handler = () => {
    sns.publish(params, (err) => {
        if(err) console.log("ERROR: ", err, err.stack) // error
        else console.log("SUCCESSFUL!!!!!    ") //success
    })
}
To start things off, you have to choose a runtime based on a language you are familiar with. For me, it is Javascript with the Node.js runtime.
Loading the AWS SDK
If your Lambda function requires external dependencies, you have to zip it together when you upload it. AWS Lambda with Node.js runtime already comes packaged with the AWS SDK for Javascript and does not require you to package it into your code by yourself.
const AWS = require('aws-sdk')Loading the SDK into your Lambda function is easy.
Using the SNS class in Lambda Function Handler
The handler is the method in your Lambda function that processes events. When invoking a function, the runtime runs the handler method.
const AWS = require('aws-sdk')
//might persist after running the Lambda function once
//can be used to "warm" your function
//such as connecting to database

exports.handler = () => {
    //code that will run each time Lambda function is triggered
}
The SNS class documentation for AWS Javascript SDK can be found here. To publish a message to an SNS topic, we will be using the publish method [publish(params = {}, callback) ⇒ AWS.Request] within the SNS class.
const AWS = require('aws-sdk')
//Create a new SNS object
const sns = new AWS.SNS()

exports.handler = () => {
	//publish a message to SNS
    sns.publish(params, (err) => {
        if(err) console.log("ERROR: ", err, err.stack) // error
        else console.log("SUCCESSFUL!") //success
    })
}
The “publish” method takes in an object (“params” in this code) with your desired configuration, including the message content you want to send.
Creating the params object
The publish method documentation gives you more details on the necessary object keys required for the method.
const params = {
    Message: process.env.SNS_MESSAGE, //Message to send
    MessageAttributes: {
      'MsgAttrName': {
        DataType: 'String',
        StringValue: 'String'
      }
    }
    TopicArn: process.env.SNS_TOPIC_ARN //SNS topic ARN
}
The “Message” key is for the actual message string you want to send and the “TopicArn” key is the target SNS topic’s ARN. I utilized Lambda environment variables here so I do not need to update my Lambda function code everytime I want to change the message or SNS topic. Environment variables are strings stored in a Lambda function’s configuration, and can be retrieved using the process.env.<env variable key> inside your code.
“MessageAttributes” requires “DataType” and “StringValue” keys, both of which I have set as ‘String’, since my message is just a simple string.
const AWS = require('aws-sdk')
const sns = new AWS.SNS()

const params = {
    Message: process.env.SNS_MESSAGE,
    MessageAttributes: {
      'MsgAttrName': {
        DataType: 'String',
        StringValue: 'String'
      }
    }
    TopicArn: process.env.SNS_TOPIC_ARN

exports.handler = () => {
    sns.publish(params, (err) => {
        if(err) console.log("ERROR: ", err, err.stack)
        else console.log("SUCCESSFUL!")
    })
}
Zipping and Uploading the code
I primarily use my Windows PC to work. Hence this part will be based on Windows 10 OS.
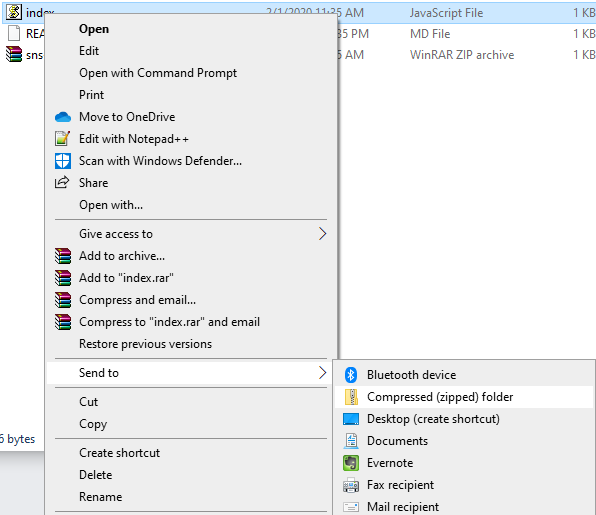
Copy the code above and paste it into an “index.js” file. Right click the file and “Send to” a “Compressed (zipped) folder”.
Head over to the Lambda console page.
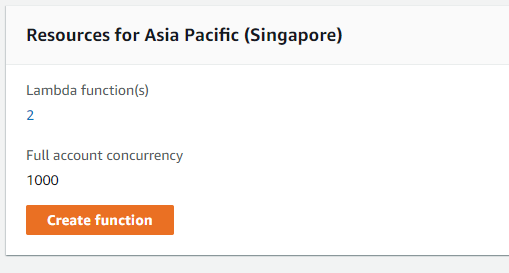
At the dashboard, click on Create function.
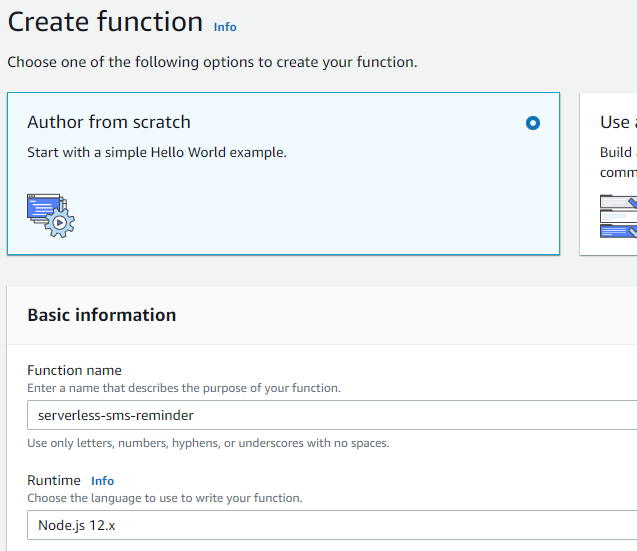
Choose the Author from scratch option and give the function a name. Click on Create function.
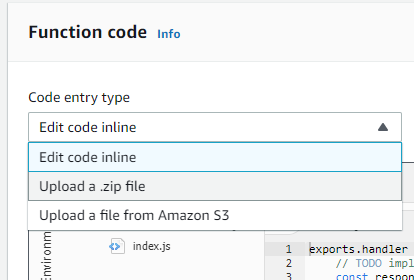
In the function page, under the Code entry type, select the dropdown options to Upload a .zip file. Browse to the index zip file we have created just now and your code should appear in the Cloud9 IDE.
Configuring SNS
Publishing a message to a SNS topic will deliver the message to all subscribers. With the Lambda function initialized, the next step is to create the SNS Topic and Subscribers.
Creating the SNS Topic and Subscription
From the AWS Console page, search for SNS. In the SNS console page, click on Topics on the navigation panel on the left.
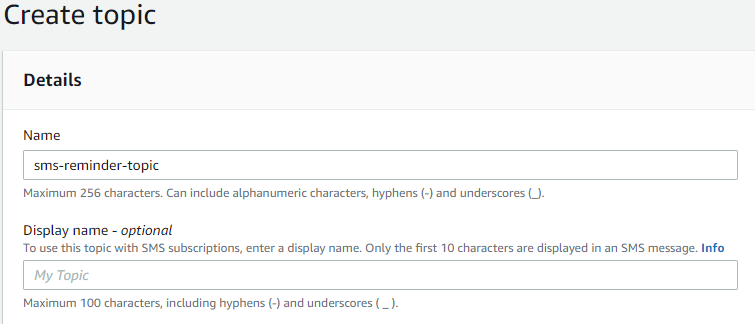
Click on Create topic and give your SNS topic a name. Click on Create topic. For now, once your topic has been created, copy your topic arn somewhere. We will be using it later.
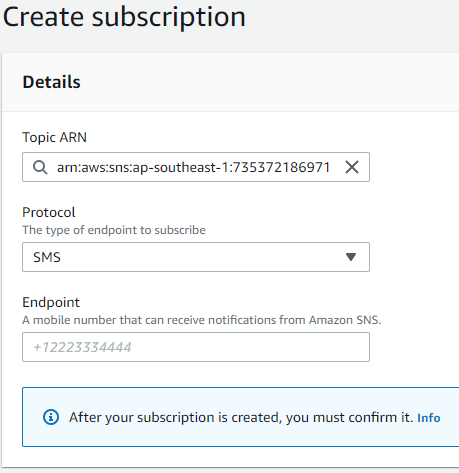
Next, we need to add your subscribers. There are different protocols you can use to publish your message to your subscribers. In this example, we will be using SMS.
Giving Lambda Function Permission to Publish SNS
Lambda do not have permission by default to interact with any AWS services (except for CloudWatch for monitoring). In this section, we give thee Lambda function permission to publish SNS
Going back to your Lambda function page, scroll down to Execution Role.
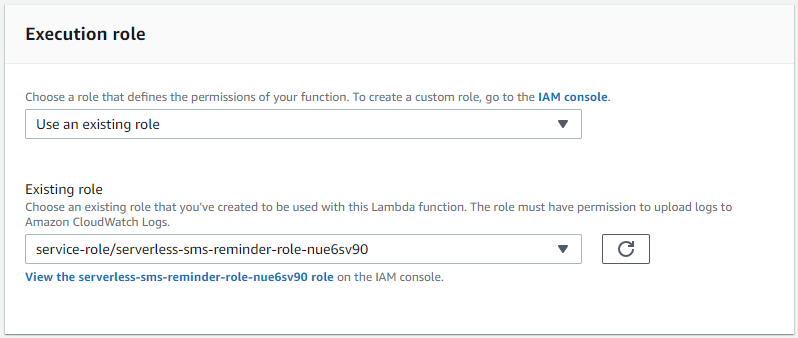
Click on the existing automatically created service role and you will be redirected to the IAM console page.
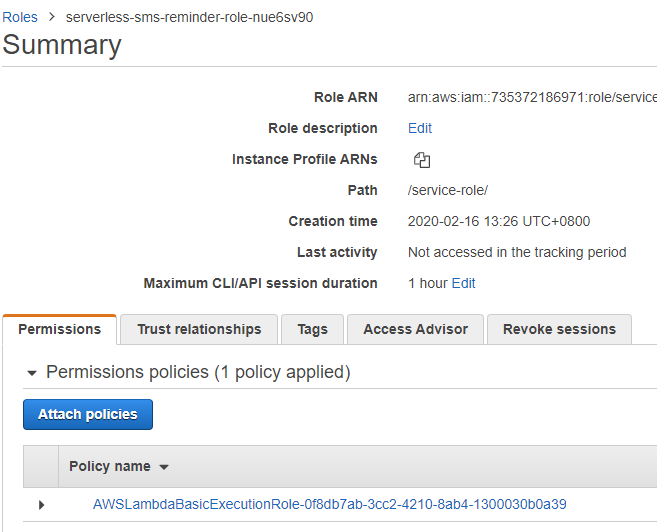
In the IAM console page for the service role, click on Attach Policies.
Remember that it is a good practice to provide only the least privilege required for any resource to perform its role. So instead of using the SNS Full Access policy, we will create our own policy by clicking on Create policy.
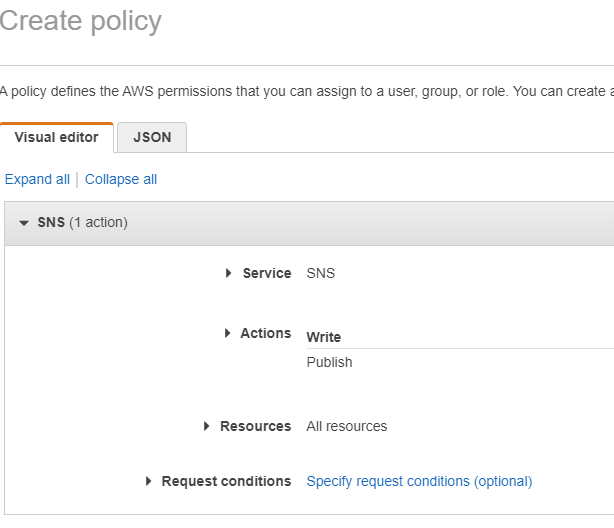
Using the Visual editor, choose SNS as the service and the Publish permission. This is the only permission we require. Set Resources to All resources. Click on Review policy.
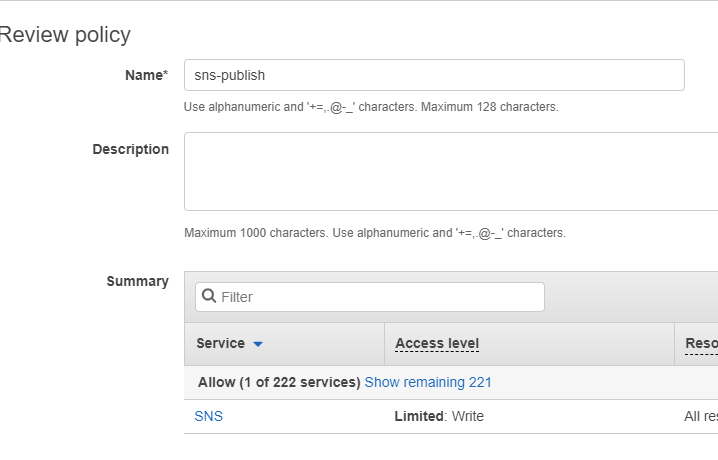
Give your newly created policy a name and click on Create policy.
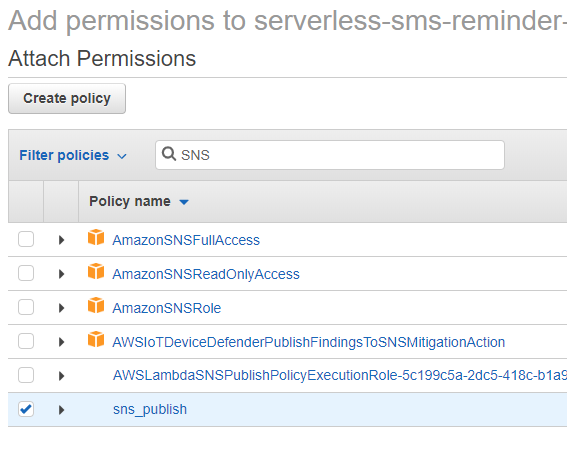
Next, to attach the policy to the previously created service role, select the IAM Policy name you have chosen in the previous step and click on Attach policy.
Adding Lambda Environment Variables
With the right permissions assigned to the Lambda function, we can now configure the environment variables to publish to the SNS topic you have previously created. Scroll down to Environment variables and click on Edit.
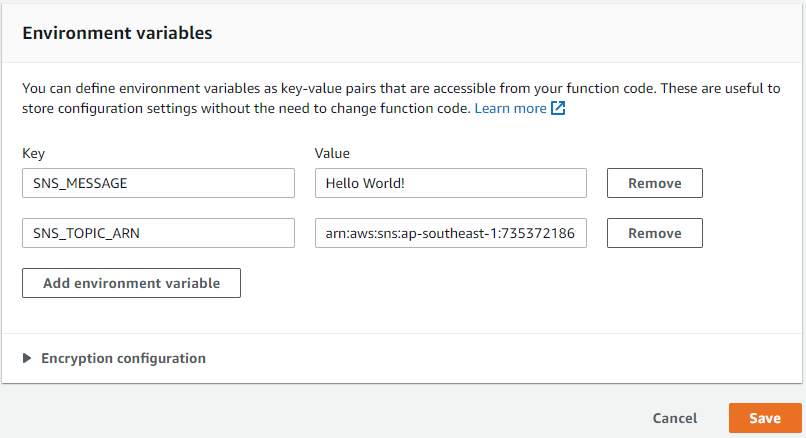
Add in your SNS Topic Arn that you have noted down before and the message you want to send to your SNS Topic subscribers. These are the environment variables that the Lambda function will utilise.
Testing the Lambda function
At this point, it is good to do a test before we configure the cron job. Click on Test on your function page. At the Configure test event window, give it an arbitrary test event name and click Create.
Now click on Test, and check whether you have received the message.
Configuring CloudWatch Events
With Lambda and SNS completed, the last step is to configure a recurring CloudWatch Event. At your Lambda function page, click on Add trigger.
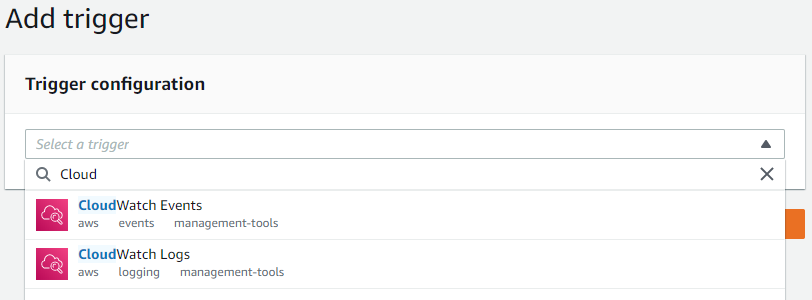
Click on CloudWatch Events. You will see more options available after clicking.
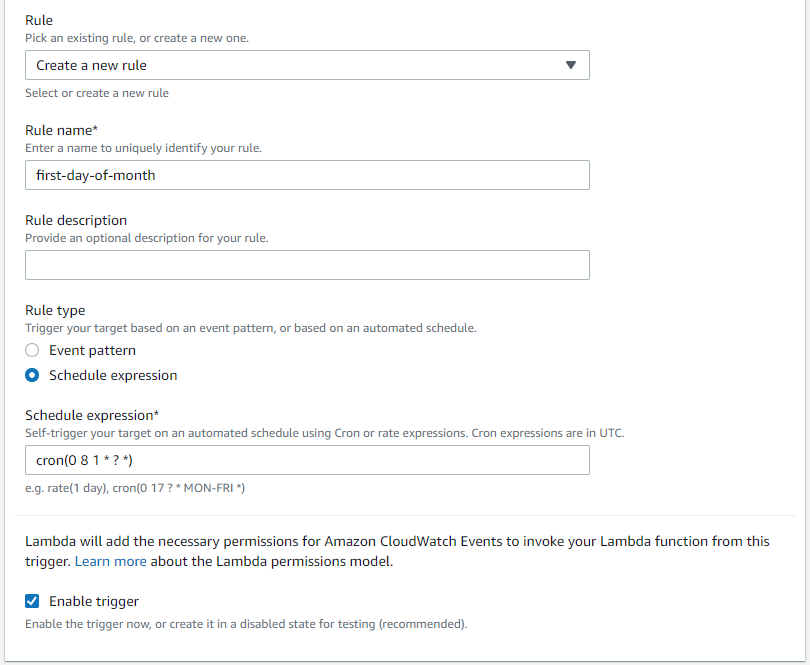
For more information about CloudWatch Events Schedule expression, click here. In the example above, the cron job will occur on the first day of each month, at 8am UTC. Click on Add and you are done.
Congratulations! You have completed configuring the Serverless SMS reminder!
Closing Thoughts
I hope you enjoyed setting up this simple serverless application. In Part 2, I will use Terraform to automate this entire deployment. Stay tuned!
Do not forget to reach out to me if you found any errors or would like to give me some feedback. Thank you for reading!
Great content! Super high-quality! Keep it up! 🙂