Previously, I created a simple reminder application with AWS Lambda and Simple Notification Service (SNS) SMS messages. With so many instant messenger applications these days, it is about time I move away from using SMS messages, specifically to Telegram.
Requirements
There are no changes to the previous requirements. To recap:
- To send a text message to people once a month
- Cheap
- Serverless on AWS
One of my main motivation to move away from SNS is due to the costs of publishing SMS messages. I wanted to bring that cost down even further.
Architecture

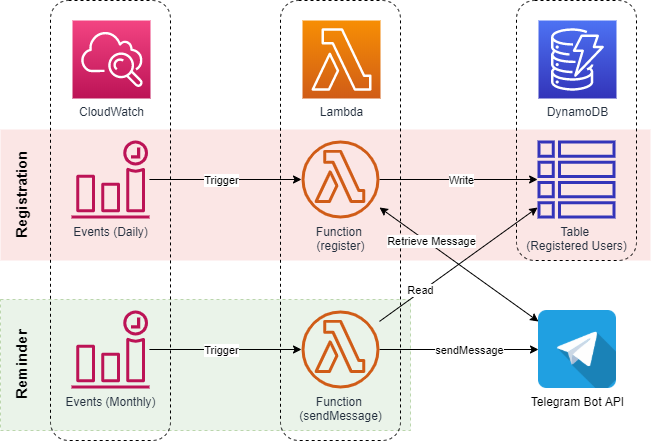
Similar to the previous application, I will still be using CloudWatch Events to trigger a Lambda function in a monthly interval to send the reminder message.
Previously, I had to manually subscribe mobile numbers to the SNS topic. The improvement this time for the Telegram bot comes from user self-service on-boarding to subscribe to the reminder notification, which is actually just a simple /start to the bot.
How the Bot works
Every day, a Lambda function (named Register) will be triggered to call the Telegram Bot API to retrieve any outstanding /start initiation. Upon detecting an outstanding message, the chat ID and username will be extracted and appended to the DynamoDB table.
Every month, a Lambda function (named sendMessage) will be triggered to scan the above-mentioned DynamoDB table, and recursively send out a custom Telegram message via the bot.
How to Configure the Bot
Step 1: Create a Telegram Bot with Botfather
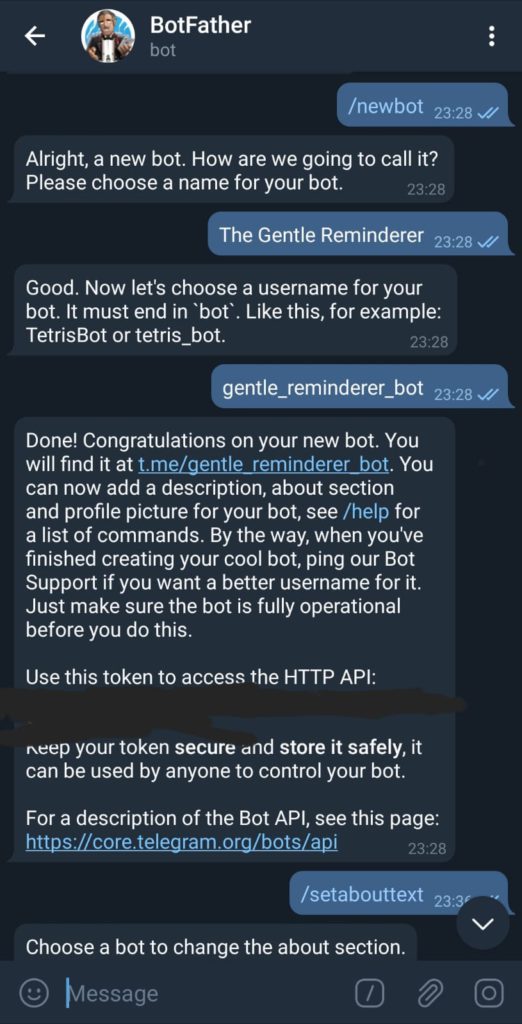
Following the guide here: https://core.telegram.org/bots, you start by looking for @Botfather in Telegram and following the instructions to create a new bot. Give your bot a meaningful name, description and profile picture.

Take note of the token that Botfather assigns to you; it will be required for your Lambda functions to call your bot API.
Step 2: Create a DynamoDB Table
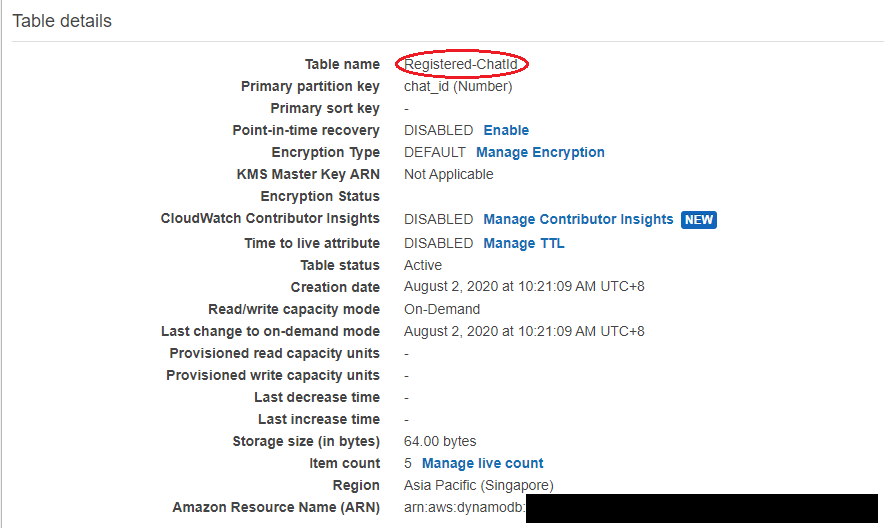
Telegram Chat IDs will be unique for every user that initiated a chat with my Telegram Bot. This made chat IDs a great candidate as the primary partition key. I set the primary partition key as chat_id (Number).
I also configured on-demand Read/Write Capacity modes, because I knew my DynamoDB Table is not going to be accessed frequently.

Remember to take note of the DynamoDB Table name, you will need it for the next step.
Step 3: Create Lambda functions (register and sendMessage)
Go to the Lambda console page and create 2 Lambda functions, 1 for the registration workflow and 1 for sending messages. The codes for the Lambda functions are as follows (I used the Node.js runtime):
// Lambda function For Registration
var AWS = require("aws-sdk")
var docClient = new AWS.DynamoDB.DocumentClient({region: "ap-southeast-1"})
const telegram = require('telegram-bot-api')

const tableName = process.env.DDB_TABLE_NAME

var bot = new telegram({
    token: process.env.TG_API_KEY,
    updates: {
        enabled: true
    }
})

const mp = new telegram.GetUpdateMessageProvider()
bot.setMessageProvider(mp)

bot.start()
.then(() => {
    console.log('API is started')
})
.catch(console.err)

exports.handler = () => {
    bot.on('update', update => {

        console.log(update)
        var params = {
            TableName: tableName,
            Item: {
                chat_id: update.message.chat.id
            }
        }
        console.log("Adding a new item...")
        docClient.put(params, (err) => {
            if (err) {
                console.log('error cant read.', JSON.stringify(err, null, 2))
                bot.sendMessage({
                    chat_id: update.message.chat.id,
                    text: `Registration to Mr Gentle Reminderer is unsuccessful. Please let Zhen Kai know of the error. ${JSON.stringify(err, null, 2)}`
                }).catch(error => { console.log(error) })
            } else {
                console.log('succeed')
                bot.sendMessage({
                    chat_id: update.message.chat.id,
                    text: 'Registration to Mr Gentle Reminderer is successful! The gentle reminder will be sent on the first day of every month. Thanks!'
                }).catch(error => { console.log(error) })
            }
        })
    })
}
// Lambda function for sending messages
var AWS = require("aws-sdk")
var docClient = new AWS.DynamoDB.DocumentClient({region: "ap-southeast-1"})
const telegram = require('telegram-bot-api')
const tableName = process.env.DDB_TABLE_NAME
var bot = new telegram({
token: process.env.TG_API_KEY,
updates: {
enabled: true
}
})
var params = {
TableName: tableName,
ProjectionExpression: "chat_id"
}
exports.handler = () => {
docClient.scan(params, (err, data) => {
if (err) {
console.error("Unable to scan the table. Error JSON:", JSON.stringify(err, null, 2))
} else {
console.log("Scan succeeded")
data.Items.forEach(chatIdObj => {
console.log('Chat ID is:', chatIdObj.chat_id)
bot.sendMessage({
chat_id: chatIdObj.chat_id,
text: 'Gentle reminder to transfer the monthly subscription fee to the subscriber. Thanks!'
}).catch(error => { console.log(error) })
})
}
})
}A few things to note:
- I used the Telegram Bot API NPM package for calling the Bot APIs.
- I zipped the npm package together with my Lambda code before I uploaded it.
- I used the DDB_TABLE_NAME environment variable for my Lambda function to know which table to call. Assign your DynamoDB Table to this variable.
- I used the TG_API_KEY environment variable for my Lambda function to know which Bot API to call. Assign your Bot token to this variable.
- Remember to give your Lambda functions the right IAM permissions to call DynamoDB.
Step 4: Configure CloudWatch Events
At the CloudWatch console page, under Events, create a new Event with the cron expression you want to trigger your respective Lambda functions.
I wanted to consolidate registration once a day and send messages once a month, so I used the following cron expressions:
- Daily register: cron(0 10 * * ? *)
- Monthly sendMessage: cron(0 11 1 * ? *)
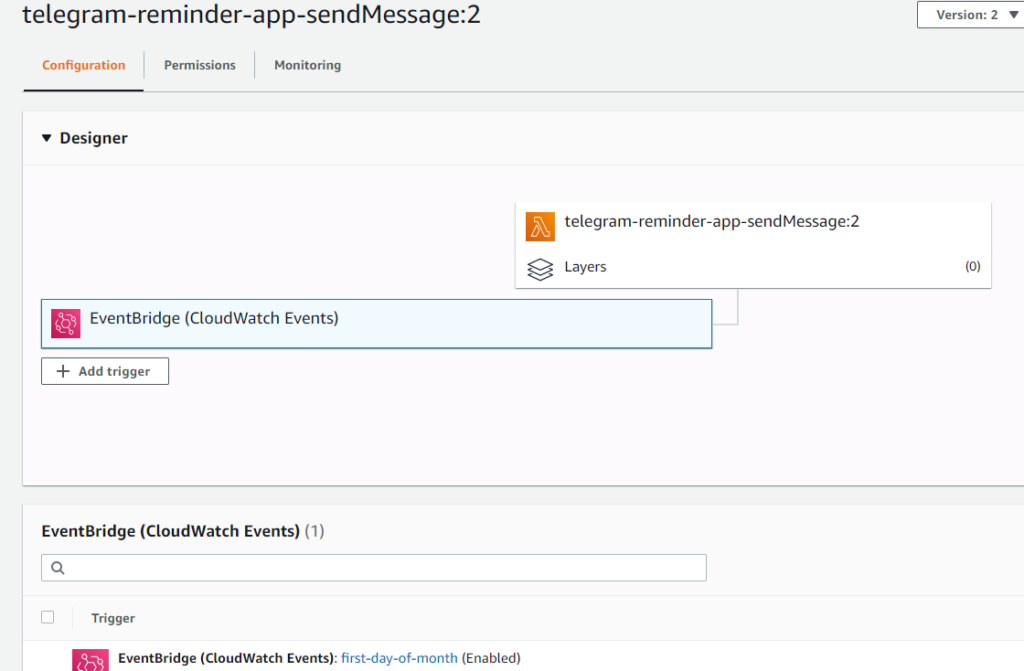
Head over to the Lambda console page and choose “+ Add trigger”, and choose EventBridge (CloudWatch Events) and select the CloudWatch events you have created.

Summary
There are still a lot of room for improvement for this simple Telegram bot I hacked together over the weekend. A quicker feedback during bot registration using webhooks is a future improvement I would want to make.
I hope you had fun with this little project. Reach out to me if you have any feedback.

Hi zhenkai,
It is awesome program, thanks a lot for sample, and i wanted to know is it full of cost free? Does AWS bill for cloud watch triggers?